
Intro
Oracle Database 26ai has arrived – and it represents a fundamental shift in how enterprises adopt AI.
With native vector database capabilities and built-in MCP support, 26ai brings AI directly into the heart of the database. This enables powerful AI-driven use cases across structured, semi-structured, and unstructured data – without the need to move data outside the platform.
While AI innovation continues to accelerate in the cloud, many organizations remain cautious. Highly sensitive data, strict regulatory requirements, and operational constraints often limit the ability to fully embrace cloud-only AI solutions. Oracle Database 26ai bridges this gap by enabling modern AI workloads in on-premises and hybrid environments, allowing enterprises to innovate with AI while maintaining security, compliance, and data sovereignty.
For Linux x86-64 platforms, Oracle Database 26ai is delivered as a Golden Image, further simplifying deployment and reducing installation complexity.
In this blog, I’ll walk through how to use Oracle AutoUpgrade to download and install Oracle Database 26ai in an on-premises environment in just a few minutes. The objective is to show how quick and effortless it is to get started with 26ai—so you can focus on exploring its AI and vector capabilities without lengthy setup or complex upgrade processes.
Pre-Requisites
Before installing Oracle Database 26ai on-premises, ensure the following prerequisites are met:
Operating System
Oracle Linux 9.6 should be installed, up and running. Ensure sufficient CPU, memory, and disk resources are available for the database installation.
Oracle AutoUpgrade
Download the AutoUpgrade tool from:
https://download.oracle.com/otn-pub/otn_software/autoupgrade.jar
Note: AutoUpgrade requires Java 11. It is not compatible with newer Java versions. Attempting to run it with unsupported Java will result in the following error:
Unsupported Java Runtime Environment 25: AutoUpgrade Patching must run with Java version 11
Before proceeding, ensure that Java 11 is installed on the system.
Install Java 11 directly from the operating system repository to avoid compatibility issues.
dnf install java-11-openjdkOracle Preinstall Package
Ensure the Oracle preinstall package has been executed to create the required OS users and set kernel parameters.
Directory Structure for AutoUpgrade
For easier management of logs, patches, and keystore files, create the following directory structure under /u01/Stage/autoupgrade:
-- oracle
mkdir -p /u01/app/oracle
mkdir -p /u01/app/oraInventory
mkdir -p u01/app/oracle/product/26.0.0/dbhome_1

-- Autoupgrade
mkdir -p /u01/Stage/autoupgrade/
mkdir -p /u01/Stage/autoupgrade/keystore
mkdir -p /u01/Stage/autoupgrade/log
mkdir -p /u01/Stage/autoupgrade/patch

-- Ownership
chown -R oracle:oinstall /u01/app/oracle
chown -R oracle:oinstall /u01/app/oraInventory
Oracle 26ai Pre-Installation RPM
Install the Oracle 26ai pre-install RPM package:
dnf install -y oracle-ai-database-preinstall-26ai.x86_64Verify AutoUpgrade Installation
First, verify that Oracle AutoUpgrade is working correctly by checking its version:
java -jar autoupgrade.jar -versionSample output :
[oracle@vbox Stage]$ java -jar autoupgrade.jar -version
build.version 25.6.251016
build.date 2025/10/16 00:04:36 +0000
build.hash 54a1e2442
build.hash_date 2025/10/15 21:11:40 +0000
build.supported_target_versions 12.2,18,19,21,23
build.type production
build.label (HEAD, tag: v25.6, origin/stable_devel, stable_devel)
build.MOS_NOTE 2485457.1
build.MOS_LINK https://support.oracle.com/epmos/faces/DocumentDisplay?id=2485457.1
This confirms that AutoUpgrade is correctly installed and ready for use.
Configure Autopgrade for My Oracle Support
To enable patch downloads, configure AutoUpgrade with My Oracle Support credentials.
Step 1: Create a Minimal Configuration File.
Create a configuration file named download.cfg.
Note: The target_version must be set to 23, even when preparing for Oracle Database 26ai.
[oracle@vbox Stage]$ cat download.cfg
# download.cfg
global.global_log_dir=/u01/Stage/autoupgrade/log
global.keystore=/u01/Stage/autoupgrade/keystore

patch1.folder=/u01/Stage/autoupgrade/patch
patch1.patch=RU,DPBP,OPATCH
patch1.target_version=23
[oracle@vbox Stage]$
Step 2: Load MOS Credentials into AutoUpgrade
Run the following command to configure MOS access and create a keystore:
java -jar autoupgrade.jar -config download.cfg -patch -load_passwordDuring this process:
- You will be prompted to create and confirm a keystore password
- AutoUpgrade will then start the MOS credential prompt
Sample output :
At the MOS> prompt, add and save your credentials, and enable auto-login (recommended):
[oracle@vbox autoupgrade]$ java -jar autoupgrade.jar -config download.cfg -patch -load_password
Processing config file ...

Starting AutoUpgrade Patching Password Loader - Type help for available options
Creating new AutoUpgrade Patching keystore - Password required
Enter password:
Enter password again:
AutoUpgrade Patching keystore was successfully created

MOS> add -user chanaka.yapa@eclipsys.ca
Enter your secret/Password:
Re-enter your secret/Password:
MOS> save
Convert the AutoUpgrade Patching keystore to auto-login [YES|NO] ? YES
MOS> exit
Verify Keystore Creation
Once completed, your MOS credentials are securely stored in the keystore directory defined in the configuration file:
[oracle@vbox autoupgrade]$ ls -l /u01/Stage/autoupgrade/keystore/
total 8
-rw-------. 1 oracle oinstall 525 Jan 29 22:52 cwallet.sso
-rw-------. 1 oracle oinstall   0 Jan 29 22:52 cwallet.sso.lck
-rw-------. 1 oracle oinstall 413 Jan 29 22:52 ewallet.p12
-rw-------. 1 oracle oinstall   0 Jan 29 22:52 ewallet.p12.lck
[oracle@vbox autoupgrade]$
At this point, AutoUpgrade is fully configured to authenticate with My Oracle Support and download required patches automatically.
Download Oracle AI Database 26ai Software
Use Oracle AutoUpgrade to download the required Oracle Database software. AutoUpgrade reads the previously created configuration file and automatically fetches the required media from My Oracle Support.
Run the following command:
java -jar autoupgrade.jar -config download.cfg -patch -mode downloadDownload in Progress
Sample output while the download is in progress:
[oracle@vbox autoupgrade]$ java -jar autoupgrade.jar -config download.cfg -patch -mode download
AutoUpgrade Patching 25.6.251016 launched with default internal options
Processing config file ...
Loading AutoUpgrade Patching keystore
AutoUpgrade Patching keystore is loaded

Connected to MOS - Searching for specified patches

-------------------------------------------------
Downloading files to /u01/Stage/autoupgrade/patch
-------------------------------------------------
DATABASE RELEASE UPDATE 23.26.1.0.0 (GOLD IMAGE)
    File: p38743961_230000_Linux-x86-64.zip \ 9%
Download Completed
Once completed, AutoUpgrade validates the downloaded files. Based on the configuration, the following artifacts are now available in the /patch directory:
Sample output : Based on the configuration file, three files are now available in /patch subdirectory.
[oracle@vbox autoupgrade]$ java -jar autoupgrade.jar -config download.cfg -patch -mode download
AutoUpgrade Patching 25.6.251016 launched with default internal options
Processing config file ...
Loading AutoUpgrade Patching keystore
AutoUpgrade Patching keystore is loaded

Connected to MOS - Searching for specified patches

-------------------------------------------------
Downloading files to /u01/Stage/autoupgrade/patch
-------------------------------------------------
DATABASE RELEASE UPDATE 23.26.1.0.0 (GOLD IMAGE)
    File: p38743961_230000_Linux-x86-64.zip - VALIDATED

DATAPUMP BUNDLE PATCH 23.26.1.0.0
    File: p38842609_2326100DBRU_Generic.zip - VALIDATED

OPatch 12.2.0.1.49 for DB 23.0.0.0.0 (Jan 2026)
    File: p6880880_230000_Linux-x86-64.zip - VALIDATED
-------------------------------------------------

[oracle@vbox autoupgrade]$
At this stage, all required software has been successfully downloaded and validated.
Create a New ORACLE_HOME for 26ai
Next, create a new ORACLE_HOME using AutoUpgrade.
Step 1: Create the Installation Configuration File
Create a new configuration file named install.cfg:
[oracle@vbox autoupgrade]$ cat install.cfg
# install.cfg
global.global_log_dir=/u01/Stage/autoupgrade/log
install1.patch=RU,DPBP,OPATCH
install1.target_version=23

install1.target_home=/u01/app/oracle/product/26.0.0/dbhome_1
install1.folder=/u01/Stage/autoupgrade/patch
install1.home_settings.oracle_base=/u01/app/oracle
install1.home_settings.edition=EE
install1.home_settings.inventory_location=/u01/app/oraInventory
install1.download=no
Step 2: Create the ORACLE_HOME
Start the AutoUpgrade job to create the new ORACLE_HOME:
java -jar autoupgrade.jar -config install.cfg -patch -mode create_homeMonitor Job Progress
You can monitor job execution from the AutoUpgrade console using the lsj -a command:
Sample output :
[oracle@vbox autoupgrade]$ java -jar autoupgrade.jar -config install.cfg -patch -mode create_home
AutoUpgrade Patching 25.6.251016 launched with default internal options
Processing config file ...
+-----------------------------------------+
| Starting AutoUpgrade Patching execution |
+-----------------------------------------+
Type 'help' to list console commands
patch> lsj -a
patch> +----+-------------+-------+---------+-------+----------+-------+---------------------+
|Job#|      DB_NAME|  STAGE|OPERATION| STATUS|START_TIME|UPDATED|              MESSAGE|
+----+-------------+-------+---------+-------+----------+-------+---------------------+
| 100|create_home_1|EXTRACT|EXECUTING|RUNNING|  23:16:47| 7s ago|Extracting gold image|
+----+-------------+-------+---------+-------+----------+-------+---------------------+
Total jobs 1

The command lsj is running every 7 seconds. PRESS ENTER TO EXIT
+----+-------------+-------+---------+-------+----------+-------+---------------------+
|Job#|      DB_NAME|  STAGE|OPERATION| STATUS|START_TIME|UPDATED|              MESSAGE|
+----+-------------+-------+---------+-------+----------+-------+---------------------+
| 100|create_home_1|EXTRACT|EXECUTING|RUNNING|  23:16:47|13s ago|Extracting gold image|
+----+-------------+-------+---------+-------+----------+-------+---------------------+
Total jobs 1
AutoUpgrade refreshes the job status every 7 seconds.
Installation Completion
After a few minutes, the job completes successfully:
The command lsj is running every 7 seconds. PRESS ENTER TO EXIT
Job 100 completed
------------------- Final Summary --------------------
Number of databases [ 1 ]
Jobs finished [1]
Jobs failed [0]
Jobs restored [0]
Jobs pending [0]
# Run the root.sh script as root for the following jobs:
For create_home_1 -> /u01/app/oracle/product/26.0.0/dbhome_1/root.sh
# Run the orainstRoot.sh script as root for the following jobs:
For create_home_1 -> /u01/app/oraInventory/orainstRoot.sh
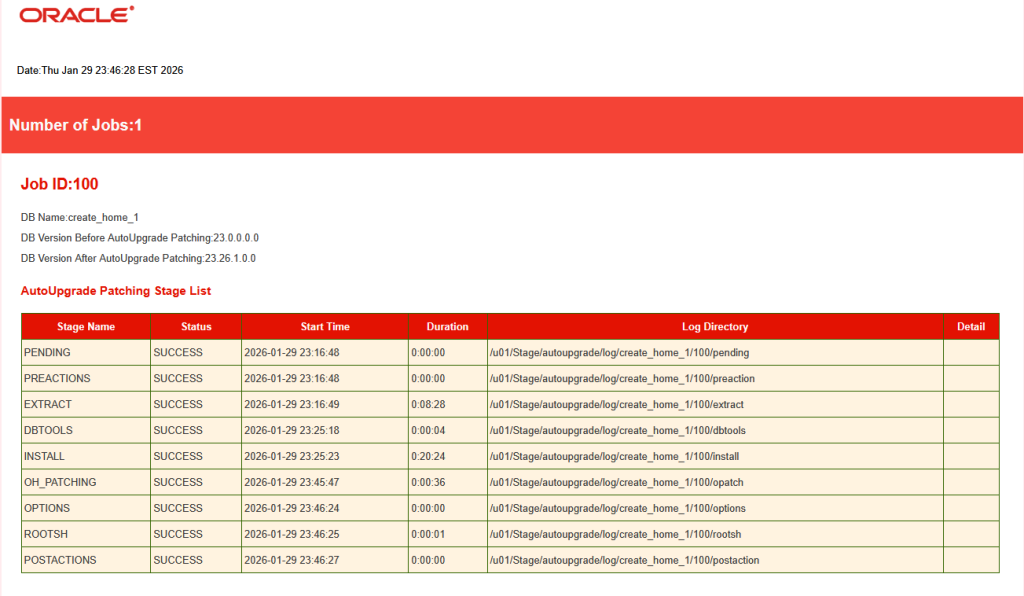
Please check the summary report at:
/u01/Stage/autoupgrade/log/cfgtoollogs/patch/auto/status/status.html
/u01/Stage/autoupgrade/log/cfgtoollogs/patch/auto/status/status.log
[oracle@vbox autoupgrade]$Run Required Root Scripts
If the Oracle user does not have sudo privileges, run the following scripts as root to finalize the installation:
# Run the root.sh script as root for the following jobs:
For create_home_1 -> /u01/app/oracle/product/26.0.0/dbhome_1/root.sh

# Run the orainstRoot.sh script as root for the following jobs:
For create_home_1 -> /u01/app/oraInventory/orainstRoot.sh
Verify Installation Status
Detailed status information is available in both text and HTML formats:
Conclusion
Oracle Database 26ai makes enterprise AI practical by bringing vector search and AI capabilities directly into the database – without moving sensitive data outside the platform. With Golden Image delivery and Oracle AutoUpgrade, deploying 26ai on-premises is fast, simple, and secure.
This streamlined approach allows organizations to adopt AI confidently in on-premises and hybrid environments, making it easier than ever to start exploring AI-driven use cases with Oracle Database 26ai.